Setting Up Synology NAS
Documenting setting up a new Synology DS-220+ NAS with Ghost Blog and Docker.

I am a big fan of Synology's NAS. They come with DSM, which made most system administration tasks easy. In this article, I am going to document what I did with a new DS-220+ NAS.
Why DS-220+?
It comes down to the cost and ability to upgrade. Synology devices are pretty expensive, in my opinion. However, you are paying for the management software, DSM, the third-party applications and you have to weight how much that is worth to you. Unfortunately for DSM 7.0, the number of supported third-party applications have decreased. It doesn't mean you cannot get equivalent functionalities. However, it does mean you have to do the work of Docker- and DSM-wrangling, there is more opportunity to shoot yourself in the foot, and a lot more experimenting to get it working before you can really customize it.
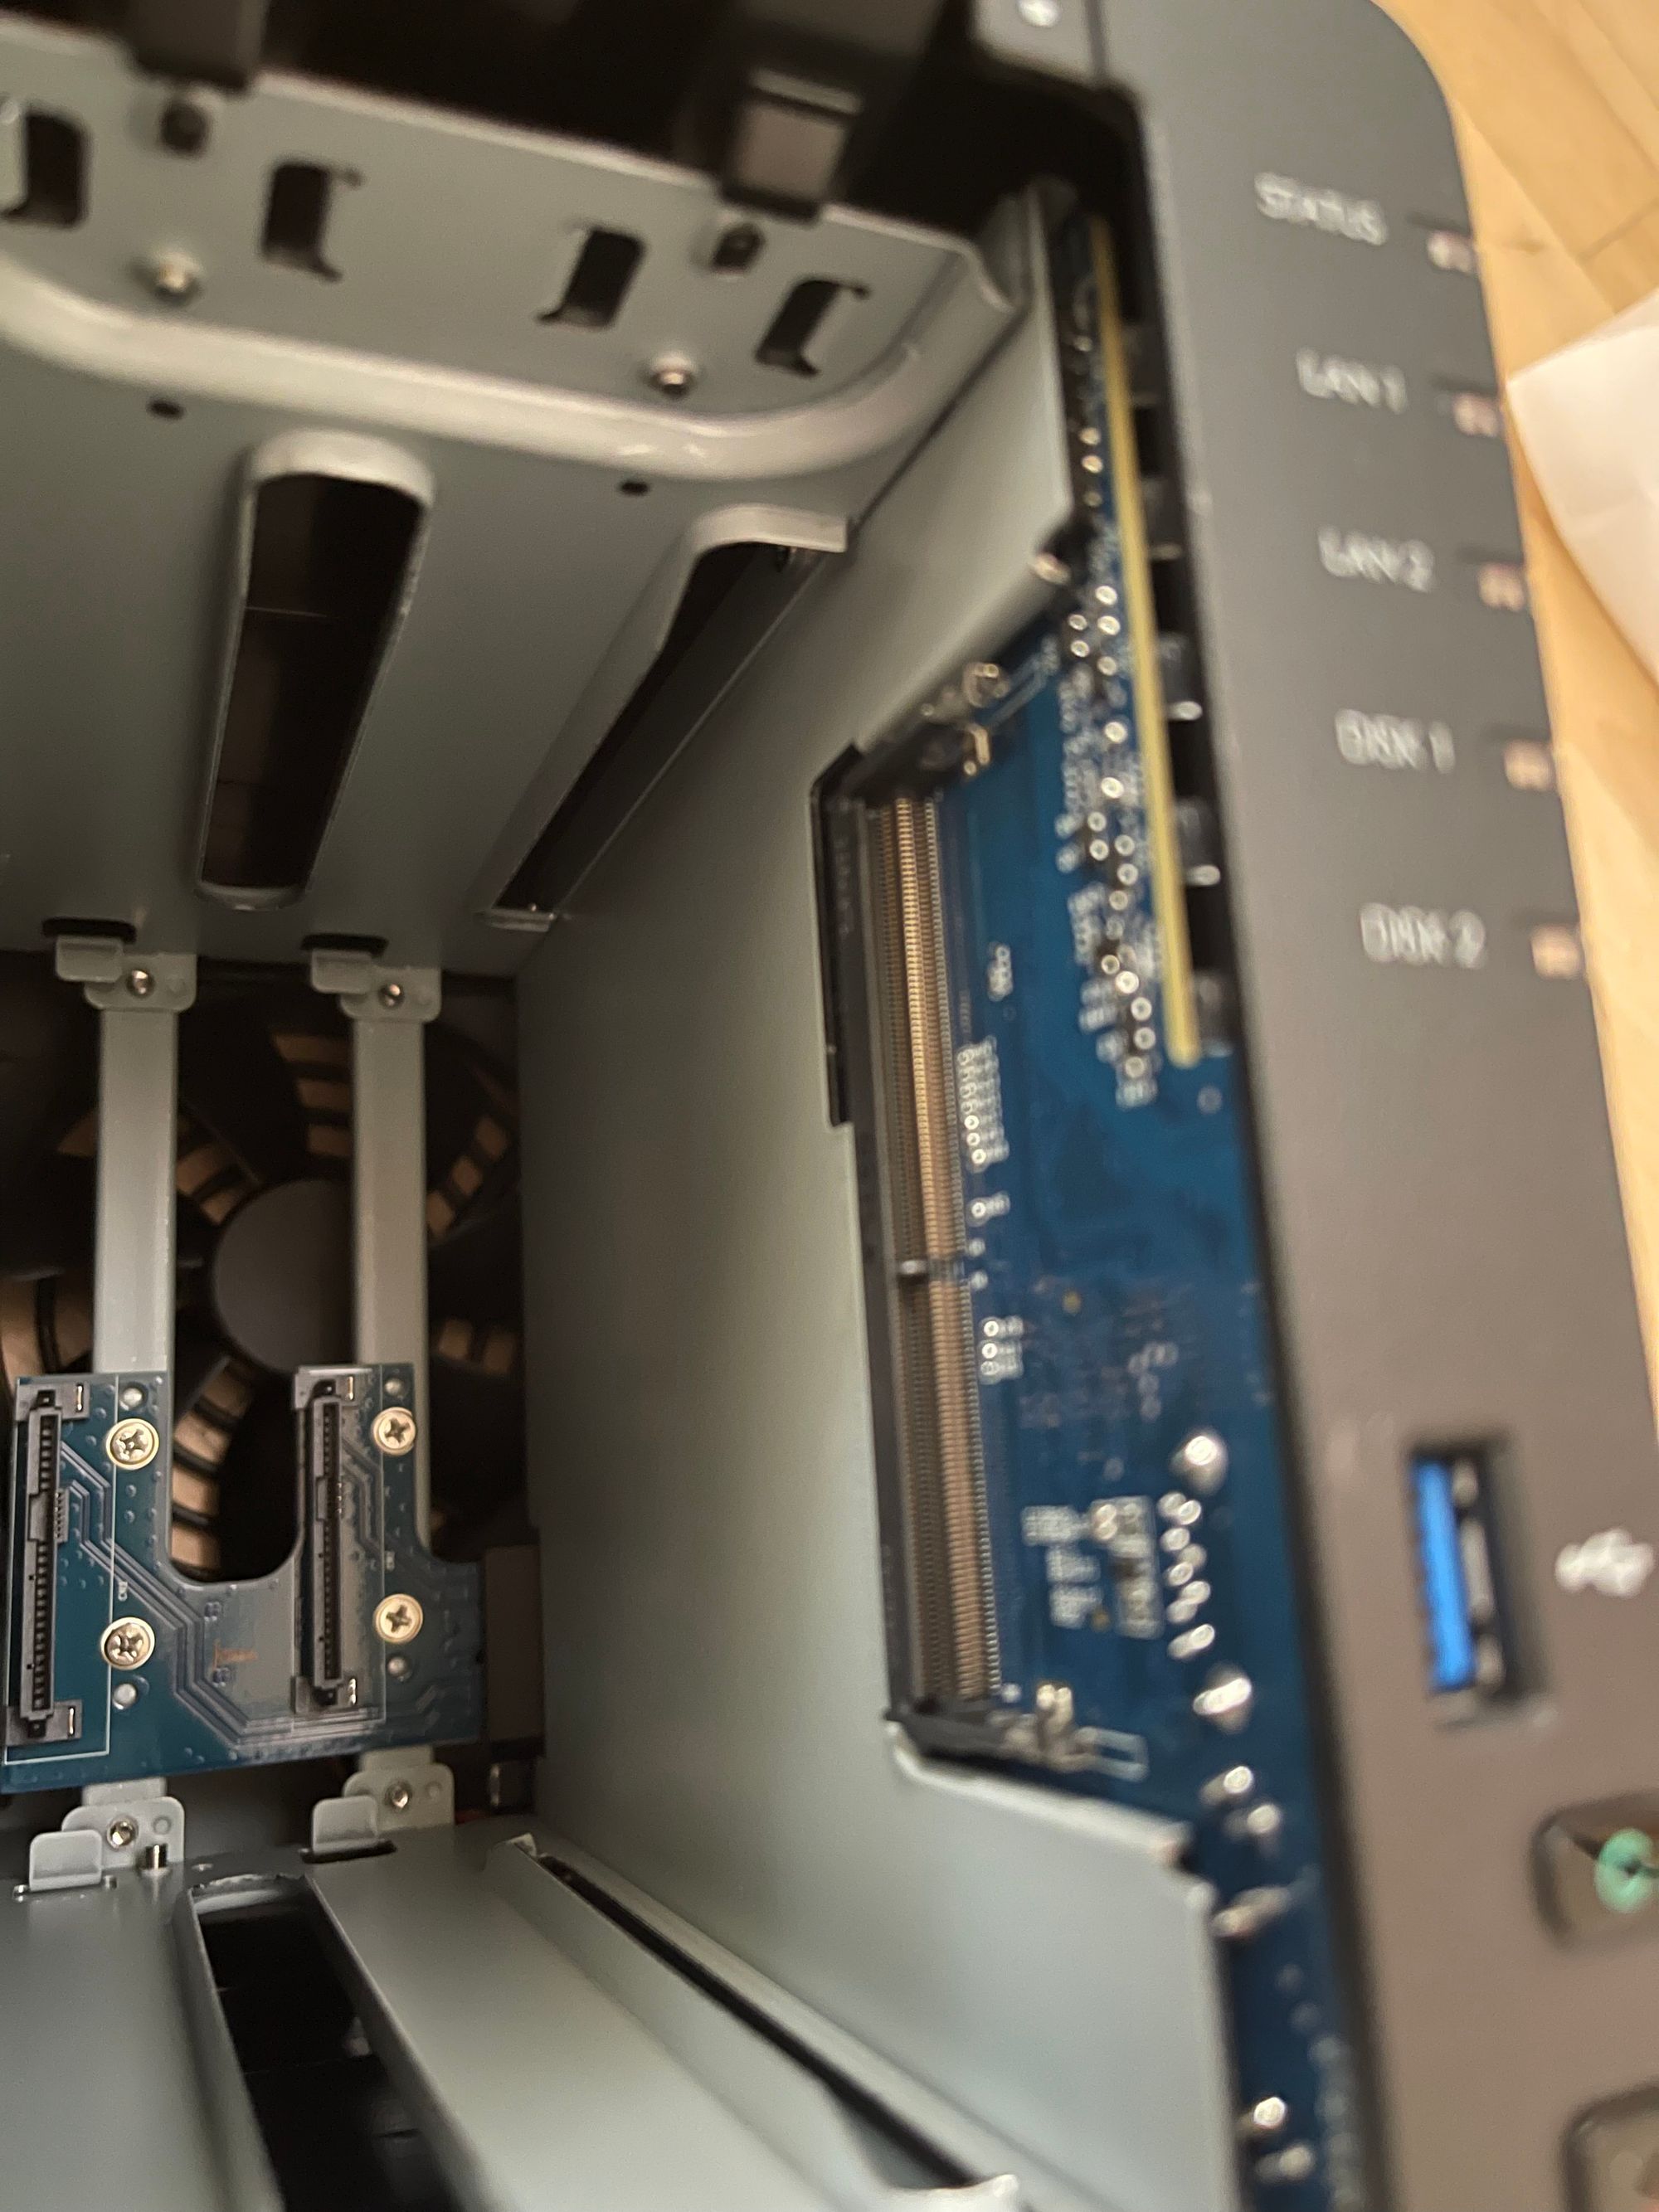
Above picture shows you location of the RAM slot, revealed when you remove the mounting caddy for hard disks. For less than $90 you can buy official SO-DIMM and expand total memory of your NAS from 2GB to 6GB. If you plan to run GitLab, for example, it'll consume 3GB of memory. Upgrading memory gives you headroom to run more Docker containers, and Linux will happily use any available memory left for caching to improve overall performance. I found memory upgrade a good investment, unlike hard drives, which all seem to die eventually. Speaking of hard drives, Blackblaze has been publishing hard drive reliability reports regularly and they are very helpful. The HGST drives I brought after reading its reports have been working fine after 6 years, recording videos from 4 IP cameras 24-hours non-stop. NAS hardware died before the drives, and by plugging them into new hardware (read instructions carefully, must remember order of drives), I was able to recover my data.
DSM 7.0 is a little disappointing, but it forced me to learn more about Docker. Synology's Docker support is very nice, but taking away packages that used to be available in DSM 6.2 seems uncool.
SSL Certificate and DDNS
All Synology NAS come with a self-signed certificate that most web browsers don't like (definitely not Firefox, Safari, Edge, and Chrome). You can tell a lot of commercial web sites, such as a certain taro chip company in Hawaii that I don't visit any more, run on an older version of Synology NAS. Nobody is recognizing Synology as a certificate authority, so the certificates that come with the NAS is no good.
Replacing that certificate with one from Let's Encrypt is pretty easy, and it was the first thing I did.
First, you need to own a domain that you have control over its DNS records. I am using Namecheap, but I imagine all vendors provide similar capabilities. First thing you want to do is use it to set up DDNS, so that your domain resolves to your NAS. You want to add an "A+ Dyniamic DNS Record", write down the password, then head over to DSM Control Panel > External Access > DDNS and add a task such that your NAS will update your DNS record automatically with your external IP address. If you paid for static IP addresses then this is not necessary; then again, if you are paying every month for them you must have done it for a reason. Namecheap has an end point that allows you the update DNS records via a request, see documentation here. You can also use another provider, and for some reason DNS-O-Matic is no longer supported in DSM 7.0. If you are also using Namecheap, you can add a customized DDNS service provider by using the following query URL:
https://dynamicdns.park-your-domain.com/update?host=@&domain=__HOSTNAME__&password=__PASSWORD__&ip=__MYIP__Once you add Namecheap as a service provider, you can use the rest of the wizard to set up automatic DDNS, use your domain name for host and user name, and the DDNS password you got from Namecheap's web console.
While your NAS will issue the request properly, and Namecheap will pick up the new IPv4 address, unfortunately DSM thinks the request has failed and you get a hate e-mail for every failure. I don't know how to fix it, but the important thing is that DNS is updated.
Once you have DDNS working, and exposed ports 80/443 of your NAS (forward those ports at the router, or put your NAS in DMZ), the DSM interface to add a certificate from Let's Encrypt should work. DSM will renew the certificate for you, so it isn't necessary to do that manually. After replacing the certificate, the most obvious change is accessing any web site your NAS is hosting via HTTPS will now work. You can use this certificate as the system default.
If you want to get to the certificate and use it for something else, set it as system default and you'll find them (public and private certificates) at /usr/syno/etc/certificate/system/default/. You can see details of your certificate with the following command:
openssl x509 -text -noout -in /usr/syno/etc/certificate/system/default/RSA-cert.pem
Unfortunately that certificate includes just the domain and not wildcard subdomains.
Locking Down NAS
Now that your NAS is reachable from outside, you want to discourage people from attacking your server. Its content is, of course, probably of no value to other people except to you and your users. But some selfish people just want to see the world burn, so you don't want to make it easy for them. You should do the following:
- Change default administrator user name. People always try
rootoradminfirst. Other popular names to avoid:SYSTEM,pi,web,www,oracle,postgres,guest,support, and things that end with1(such asuser1,profile1, etc.). - Change your password. Pick a good one that you actually have to type somewhat carefully.
- Turn on two-factor authentication. Scan the QR code to link your mobile device and use an authentication app that generates one-time passcodes. This means it will take you longer to log into DSM, since you have to fumble for another device to authenticate, but, hopefully people who are not authorized will not get to that device physically.
- Change your SSH port number. Port numbers below 1024 are all well-known and nefarious people may try to brute-force
rootpasswords on port 22. Turning off SSH daemon is probably better, but it is much easier to work with Docker from a terminal, therefore... - Turn on firewall. Create a profile that allows clients connecting from your own subnet. Deny external access to DSM, etc. Allow only port 80 (HTTP) and 443 (HTTPS). If you have read many news articles about state-sponsored hackers like I did, you'll understandably deny requests from China, India, and Russia (really, nobody has reasons to access ports other than 80 and 443). DSM has a wizard that will allow you to create firewall rules for a location (country), and port numbers for applications, so you don't have to set up the IP and port ranges by hand. You can only specify 15 locations per rule, so maybe you want to create deny rules per continent. =)
- Turn on Auto Block and DSM will ban IP addresses that failed login attempt too many times. That IP address is banned forever by default.
- Think carefully about what you want to do, and whether it is necessary to allow everyone to reach your NAS. I wanted to use it to host Ghost blog and web sites, so it cannot be helped. It is actually the reason for setting up a new NAS, because I am assuming, worst case scenario, someone will be able to access everything on it.
- Install Antivirus Essential, especially if you are squirreling away that demo game from high school on your NAS. Many of them have ad-ware and other unwanted bits. By default the file will be in quarantine until you decide what to do with it (delete permanently or restore to original location).
Installing Docker and Apache
This is done from the Package Center, where a lot of other things could be installed easily with a click in DSM 6.2, but alas, not 7.0. Installing Docker because we need it to host a database and the Ghost blogging software.
Installing Apache if you want per-user web sites. That feature will automatically for each user on your DSM create a www directory inside their home directories. Anything user puts in there will be accessible under URL host/~user/. Very nice. You can configure per-user web sites from Web Station (which you have to install, too).
Once Docker is installed, docker and docker-compose commands are available if you SSH to your NAS. You can create individual containers from an image by clicking the "Launch" button in the GUI in DSM, but I find docker-compose to be easier; more on that later.
Download Images
Launch Docker, go to Registry and search for "mariadb" and "ghost." Some articles on Internet wanted specific versions; I downloaded "latest" and they worked fine.
Why Maria DB
Why not MySQL? Because I tried, and it wouldn't allow database connection from certain IP addresses unless you grant permission. Maybe I did something wrong, but if you are reading this article, you are probably in the same boat that I was, maybe not as clueless as me, but I am sharing what worked for me. From the port number to file locations, and documentation, Maria DB is fully compatible with MySQL.
Setting up Docker Container
This was my reason for downloading images manually. If you select the image you downloaded, clicking on the link on the far right allows you to see its documentation on Docker Hub. For example: Ghost and Maria DB.
The way Docker images are set up, all the software bits are already installed and configured, often they just need a place to persist data and a few environment variables to tell them how to bootstrap the software you want to run. Then, you can manage and map ports to the ports containers are using, so that for example, while the software inside the separately containers think it is individually using port 80, but each container actually communicates via different ports on the machine hosting the containers and they can co-exist on the same host.
My preferred way to set up the containers to define the various mappings and environment variables is through docker-compose.yml, a text file that you can edit and type everything, no need clicking. Here is the file that sets up both the database and blog containers, named "ghost-db" and "ghost-blog":
version: '3.1'

services:

  ghost:
    image: ghost:latest
    container_name: ghost-blog
    restart: always
    ports:
      - 8080:2368
    volumes:
      - STORE_ROOT/ghost/blog:/var/lib/ghost/content
    environment:
      # see https://ghost.org/docs/config/#configuration-options
      database__client: mysql
      database__connection__host: db
      database__connection__user: root
      database__connection__password: PASSWORD
      database__connection__database: ghost
      # this url value is just an example, and is likely wrong for your environment!
      url: http://URL
      # contrary to the default mentioned in the linked documentation, this image defaults to NODE_ENV=production (so development mode needs to be explicitly specified if desired)
      #NODE_ENV: development

  db:
    image: mariadb:latest
    container_name: ghost-db
    restart: always
    volumes:
      - STORE_ROOT/ghost/db:/var/lib/mysql
    environment:
      MYSQL_ROOT_PASSWORD: PASSWORD
Customize your instance with your own PASSWORD, STORE_ROOT, and URL. STORE_ROOT is the shared folder on your NAS where you are keeping the data, such as /volume1/docker/. I then store the database and Ghost blog datafiles separately in ghost/db and ghost/blog. With above configuration, once everything is up and running, you can access your blog at http://URL:8080.
After you finished editing the file, at your SSH prompt, navigate to the directory containing docker-compose.yml and run docker-compose up -d. It'll create the containers for you, and you'll see them in DSM Docker GUI, as if you created them via "Launch" wizard.
Mail Setup
Built in mail module didn't work for me. When I tried inviting new staff with e-mail, the spinner kept going for 30 seconds before an error is displayed. As it turns out, you want to use an external service for sending mails, especially if you want to use the new bulk mail feature. I don't need Mailgun For just few e-mail invitations, and I ended up using GMail.
To make that work, you want to do three things first:
- Create GMail account, and
- At https://myaccount.google.com/, turn on "Less secure app access," and
- At https://mail.google.com/mail/u/0/#settings/fwdandpop, enable IMAP.
Then, at your SSH prompt, get shell access to your running container: docker exec -it ghost-blog bash. Once you are in, navigate to /var/lib/ghost and edit config.production.json. If vi doesn't exist, you can install it via Debian apt commands: apt update; apt install vim.
Modify the mail section like this:
  "mail": {
    "service": "Gmail",
    "transport": "SMTP",
    "options" : {
            "host" : "smtp.gmail.com",
            "port" : 465,
            "secureConnection" : true,
            "auth" : {
                    "user" : "ME@gmail.com",
                    "pass" : "PASSWORD"
            }
    }
  },
You need to have created GMail account, and replace ME and PASSWORD with your account name and password. Once you are done editing, you can restart the container for it to take effect. Invitations should now go out as you expect.
Test Drive
Once the containers are up, point your browser to port 8080 of your NAS, you should see the front page of your Ghost blog pre-filled with a few posts. You can then customize your Ghost blog at URL:
http://...:8080/ghost/
It'll ask you to create one account that will be the owner who can then invite more editors, authors, and contributors from the Staff management sidebar entry.
To Be Continued...
That's pretty good for a few hours of experimenting. The things you'll learn about Docker along the way is priceless and well worth the effort to roll your own. There are numerous Docker images out there and by configuring the containers yourself, you are less dependent on Synology continuing to support the third-party packages.
Next, I am off to learning more about them SSL certificates!
Update (SSL)
I made more changes after the writing the original post, and I am now able to connect to Ghost via HTTPS. For getting new certificate the steps are a little more involved:
- From Namecheap's web console, I added CNAME records for the subdomains I wanted to use. Got to wait a little for DNS to propagate.
- Then in DSM, I requested another certificate from Let's Encrypt, this time adding all the subdomains.
- From DSM Control Panel > Login Portal >Advanced > Reverse Proxy, I created a rule that accepts source traffic using HTTPS protocol, connecting to the subdomain I am targeting, port 443. I route traffic to my NAS, via HTTP to port 8080 (which Docker will route to Ghost container). A reverse proxy acts as a guide to incoming requests, and clients have no idea who they are really talking to behind the proxy. More explaination here: https://en.wikipedia.org/wiki/Reverse_proxy
All this work is only because I want to use a subdomain for accessing Ghost blog, without having to specify the port number or conflicting with other software I may install later.
What I learned is that simply by changing the default system certificate and setting up reverse proxy, we are 90% of our way there. This is because Nginx on your NAS is acting as reverse proxy, and it is using the default certificate you just installed. Except that, because I made a mistake specifying HTTP URL in my docker-compose.yml above, now images are served via HTTP. We want to serve everything via HTTPS, otherwise web browsers will complain about mixed, potentially unsafe content.
The fix is not too terrible. All your data is outside the Docker container (remember we setup the volumes earlier). So all I had to do was deleting the containers and recreating them with an updated docker-compose.yml containing a new, HTTPS, URL. From SSH terminal, it is just a few commands. First, docker ps to list running containers:
ash-4.4# docker ps
CONTAINER ID   IMAGE            COMMAND                  CREATED          STATUS          PORTS                    NAMES
23e5eb72498b   ghost:latest     "docker-entrypoint.s…"   58 minutes ago   Up 58 minutes   0.0.0.0:8080->2368/tcp   ghost-blog
abc5f309adad   mariadb:latest   "docker-entrypoint.s…"   58 minutes ago   Up 58 minutes   3306/tcp                 ghost-db
There are two, one for Ghost blog and another for Maria DB. Stop them with the container IDs:
ash-4.4# docker stop 23e5eb72498b abc5f309adad
23e5eb72498b
abc5f309adad
Then delete them:
ash-4.4# docker rm 23e5eb72498b abc5f309adad
23e5eb72498b
abc5f309adad
Update docker-compose.yml with new, HTTPS, URL. That's the line mid-way through the file staring with string url:. If you want to keep your old URL but just make everything HTTPS, simply update the protocol to read https:// instead of http://.
After you are done editing, command docker-compose up -d will re-create the containers and bring them back on-line. Optionally, you can use docker-compose pull command to check if the Docker images had been updated and download latest version from registry. In a minute, everything will work as you expect (mostly) but now content is served via HTTPS. Not 100% and I must have screwed something up here, because theme of my Ghost blog went back to Casper, but other than that, all data and customization persisted from before the update and everything stayed the same (title, logos time zone, etc.). So I just had to activate the theme again to really restore everything.
Update (Locking Down)
A day after the post went live initially, I looked at logs for my NAS (install package Log Center). You can filter logs on "Connection" and see frequency of people trying to SSH in with various user names. Then, from DSM Control Panel > Security > Protection > Allow/Block List > Block List, you can see they are from all over the world and DSM blocked their IP addresses forever. Don't know why nor what they want, but probably not trying to befriend you and you must to be prepared to deal with such nuisance if people can reach your NAS from Internet.
Perhaps add your subnet to the allow list, in case if you typed DSM password wrong too many times, you don't want to get blocked permanently. Or just be really careful and take your time to type your login and password. Check the caps lock key and keep babies away from your keyboard. =)
Finally
I wanted to do something to completely hide the port numbers and change the elements of request URL. Here is how I did it, perhaps you'll find it useful.